
Even a small leak can waste a significant amount of water over time. A leak of just 10 drops per minute will waste almost 300 gallons in a year. Use this guideline to make sure your fixtures are working properly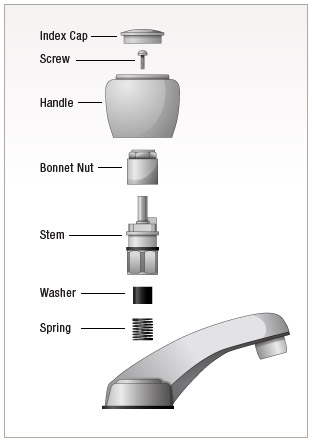 and not wasting water.
- Step 1: Shut off the cold and hot water supply valves, which are usually below the sink. If they’re not below the sink, shut off the master water supply for the whole house. Then follow the directions below according to the type of faucet you need to repair.
Compression Faucet
- Step 2: Remove the decorative index cap from the handle. Remove the handle screw and carefully pry under the handles to remove them.
- Step 3: With the handle removed, use an adjustable wrench to loosen the bonnet nut that holds the stem in place. Thread the stem out of the faucet and loosen the screw that holds the washer to the stem.
- Step 4: Find an exact replacement washer and fasten it to the stem with a new washer screw, if necessary. Then reinstall the stem, bonnet nut and handle.
Two-Handle Washerless Faucet
- Step 2: With a two-handle washerless faucet, access the cartridge as you would for a compression faucet — start at the valve handle and work your way down.
- Step 3: Remove the cartridge and replace it with a new unit. Then reinstall the stem, bonnet nut and handle.
Single-Handle Washerless Faucet
- Step 2: With a single-handle faucet, the exact procedure to remove the valve cartridge will vary by manufacturer. Start by removing the handle screw, typically located under the handle or on top of the handle under a hood. Remove the faucet handle screw and remove the handle.
- Step 3: Once the handle is off, loosen the nut that conceals the valve cartridge.
- Step 4: Remove the clip, which holds the valve cartridge in place. Pull out the valve cartridge and replace it with a new unit. Then reinstall the bonnet nut and handle.